Day 08 - Short term goals for this month and why.
Wellllll If we go by the rest of this month (being that its the 28th) I would say I still want to finish some awesome pot holders, at work, I've been jotting down ideas like crazy, i just keep thinking of some cool things to do. If we go by the next 30 days concept of "this month" I want to finish making a birthday gift for a lucky 1yr old, i want to try and get my Etsy shop up and Running, and i want to do some serious blogging (and working on tutorials to come) that seems like a good goal, wouldn't you say??
but this weekend's plan?
1) bang out AT LEAST 3 more cute pot holders.
2) start Tyler's Birthday Present
3) work on the Burberry inspired dress I have dancing around in my head
4) Look into making some cute crib bedding and a bed skirt for the little girls bed
5)make some cute checkbooks and matching change purses and coffee cozies

Friday, January 28, 2011
Thursday, January 27, 2011
Mission for tonight...
Make some ADORABLE pot holders!!! There's a contest running at Prudent Baby for a new sewing machine: project runway inspired Brother Machines, and I want one, No, I NEED one. My sewing machine broke last week, (boooo) so I've been working with a gimp sewing machine. My amazing husband told me I was allowed to get a new one (w.h.a.t.e.v.e.r. one I wanted. Yes, love him!) with our tax return money, but I would much prefer to win one. I know the odds are very low, but it’s all worth a try in my opinion. I’m thinking a piece sign one, maybe a valentines inspired one, maybe a retro looking one, who knows. I’m going to go all out and try and win, they said as many entries as you want. So that’s the next project. Maybe I'll even do a tutorial one if I make a cute enough one up. Either way, I'll post what I made :)
This Is My Stash.
This is my Fabric stash. I thought it would be fun to take pictures of it to show everyone what i have stockpiled. My husband thinks I have too much, though he didn't say that directly. His exact words after I brought it all out so that i could photograph it was "do you think you'll need to get anymore anytime soon". Not said sarcastically or anything and he's really good about letting me buy anything i want, but i guess when even he thinks I have too much, I really do have too much... But this is my stash :)
My Designer fabric from Debbie Mumm.... I LOVE her designs:

My Cotton Woven (with my one interlock thrown in):

My fleece, Canvas, and Corduroy:

My Flannels:

My (very extensive) Fat Quarters Collection:

These pictures are motivation to get some work done using fabric I already have (though i do know have to buy some cream or white jersey fabric to do a project). That way, my husband doesn't have a heart attach next time I pull it all out. He had no clue how much there was, because i store it very neatly in closed bins and baskets... maybe I should have waited to take these pictures for a day he wasn't home hahaha.
30 Day Challenge: Day Seven
Day Seven: A picture of someone/something that has the biggest impact on you


My Daughter is my inspiration for everything. She changed my life in more ways than any other person and I wouldn't give it back for anything.
Wednesday, January 26, 2011
Project Three: Diaper Bag
Project Three: Diaper Bag
I decided I kind of hate my diaper bag. It was one of those cheapy 25 dollar diaper bags from Babies ‘R Us. So for project numero tres I decided on making a new diaper bag for myself so I would be carrying diapers in style from now on (and boy do I get a lot of good comments about this bag!)
I found the Tutorial for this project on a blog I follow and I just loved the look of it and I knew in my stash, I had the PERFECT three prints for this project.

I started By Cutting out all the pieces I needed for this and ironing on the interfacing for each piece. I interfaced both shoulder straps, all the exterior fabrics (including the pockets) and double interfaced the bottom to add stability.

After getting these done, all I laid out all the fabric parts for the front and back outside of the bag and pinned it together, then sewed the straps on stopping about 1 inch from the top of the bag on both sides of each strap piece (4 stitch lines on each side of the bag total).

I then attached all the exterior pieces together and sewed everything based on her model in the tutorial. If I would have done this again, I would have finished each seam about a ½ inch from the end of each side so that the perpendicular piece attached easier. After doing the outside, I did the inside piece as well (the same way then put the bag together with the exterior of the bag sitting inside the interior of the bag with right sides facing.

After that, I sewed around the top (I sewed all the way around and left my flipping spot open in the lining so that that spot wouldn’t be as visible when I flipped it and sewed it shut).

Once done wit that I flipped the exterior inside and top stitched around the to opening of the bag, (this is why I stopped the strap stitching about an inch from the top, so I could more easily to this stitching).

After that, done, fill ‘er up and off we go J

I have to admit, I reallllly love this bag. I’m throwing around the idea of making myself one to put my things in for work as well. Though if I would make another, I would definitely do it in a thicker fabric like a canvas or a duck, (I like the idea of a duck since you can get those in really fun prints too) that would give the bag a little more structure than even the interfacing could give it. What do you think? Adorable?

30 Day Challenge: Day Six
Day Six: A picture of the cast from your favorite show


I'm pretty much obsessed with several TV shows... but by far, i find myself involved more in this show than any, (though i'm a huge "Grey's Anatomy" and "Gossip Girl" fan too)
Tuesday, January 25, 2011
30 Day Challenge: Day Five
Day Five: A Picture of Somewhere... You've Been To.


This is the vew from the top of a pretty high mountain I climbed in the process of GPSing for work in October of 2008. Its a little town (mostly farmland for raising cattle) about an hour out of a bigger (still TINY) called Craig, CO i was there for a month and every day was an adventure. This place was beautiful. when we got up there, after basically rock climbing the entire way up, we decided to take a break and enjoy the scenery. Every time I look at this place I smile.
Project Two: Checkbook Cover (tutorial)
Checkbook Cover Tutorial
This will be my first in a series of tutorials. We’ll call it “Tutorial Tuesday”. Each week I’ll try to post a new design by me or a way to personalize someone else’s design. We’ll see how things go; like I said before, this is a constant work in progress.
Without further ado—The Checkbook Cover

This is an easy 15 minutes from start to finish project and is a great gift for anyone. I came up with this design after my plastic checkbook cover (you get for free) ripped. All you need is all your basics (machine, scissors, thread, pins, iron, etc), 2 fat quarters, and less than ½ yard of interfacing (I used medium weight fusible, in this tutorial I only interfaced one side since the other side was a thick duck cotton, if you’re using two regular cotton weaves, I’d advise to interface both sides)
First, cut an 8”x14” rectangle out of each fabric and a rectangle of interfacing per outer fabric. Iron the interfacing to each fabric’s wrong side.
Lay them facing right sides together and sew all the way around with a ½ inch seam allowance (I always like how much flatter the seams look when you flip them with the larger seam allowances.) Leave a 3-4 inch opening at one of the short sides (for flipping).

Clip corners so that it will lay flatter
Turn right sides out, making sure the corners get pushed out. I use a closed pen to do this. Then iron flat.

Stitch an 1/8 inch seam along EACH of the short ends (for continuity and to close the seem used to flip it)

Fold each seamed end down 2 ¾ - 3 inches toward the center and iron again

With seams folded up, stitch a 1/8 inch seam around the entire thing. (This will make the pockets)

Fold in half with the pockets on the inside and iron it again.
Viola! You’re done. Insert your checkbook and drop it in your purse.

Monday, January 24, 2011
30 Day Challenge: Day Four
Day Four: A habit that you wish you didn't have.
(As you can tell I don't have internet at my home because its wayyyy to expensive for its own good, like 80 a month for me to have internet at my house, so I’m going to be picking up today)
I would like to call my bad habit, proCRAFTination, well it should be more like not just for crafts, but for any sort of project in general. Sometimes I get my mind set on doing something be it sewing a new bag to rearranging my living room, and I have to do in right then. I may skip a meal to do it, I may not get to bed until 3am... but I have to finish it. Sometimes I should be doing other things like cleaning my kitchen/bathroom or paying attention to my husband, but until I get it done, those things are on the back burner for me.
Thursday, January 20, 2011
30 Day Challenge: Day Three
Day Three: What you would find in my bag.

sewing patterns (i know, who does that???)
pens
wallet
check book
eye drops
glasses
medicine
hand sanitizer
tea bags

sewing patterns (i know, who does that???)
pens
wallet
check book
eye drops
glasses
medicine
hand sanitizer
tea bags
Wednesday, January 19, 2011
My Tools
My Tools
I thought I’d introduce you to the tools I use. Most of them are nothing special, and very afford able. This goes to show that you don’t need expensive tools to get the job done. (Even though I have my eye on an expensive machine and I’d looooove to have a serger sometime in the future).
This Is my Workspace:
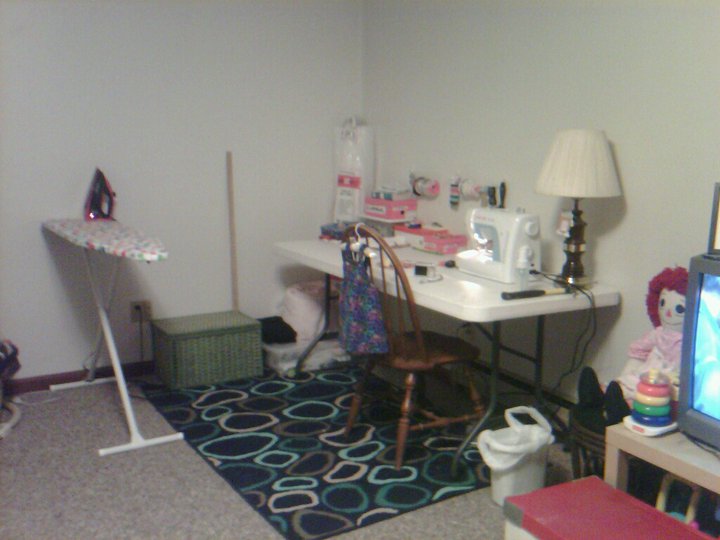

It is just a plastic/metal folding table positioned in the corner of my living room. One of these’s days I’d like to have a special craft/sewing room, but I doubt that will ever happen. I also kind of enjoy being out there in the living room. That is where my family spends our time. That way I don’t feel like I’m squirreled away from everyone.

My machine is nothing special, just a Singer Simple model 3116.
18 stitch patterns, very basic. I bought this almost 10 years ago, when money was tight, I was young, and I wasn’t sewing as much. Since then, I’ve wanted to upgrade… but I just can’t bring myself to get a new machine. I’d like a Janome 7330 Magnolia. It’s a nice machine that is computerized, a lot quieter than mine and has 30 stitch options. But it is also a 350 dollar machine on Amazon.

My other tools I have are my self healing cutting board, for a while I was cutting straight on my table, which I didn’t really care about. It was a cheap table we had in our basement for a long time, but I find everything cuts better on that mat. I’m glad I spent that money... especially since I got it on sale 50% off with a coupon, I love coupons.
I also recently got a thread set on sale (again, yay sales!), 26 spools of Gutermann’s thread in a nifty plastic case. They all have rods through them to keep them in place and once I run out of a thread, I can just replace it with another spool. It makes it a lot easier to match thread, that way I don’t have to buy a special spool each time I get a different color fabric (which happens quite often).
I also made myself a ribbon holder, so that when I need some, I just pull out as much as I want and cut. Right now it’s just my ribbon threaded onto a ribbon hung from 3m hooks. I would like to get a dowel rod and make something more permanent, but most of the time; I am just too lazy to head out to the hardware store to get something started.
I have my snaps organized by style and size in the little white circular tuber-ware. Those were the best dollar store finds I’ve had in a while.
I have a nifty chest style basket that I keep all my fabric stored in. It keeps it organized and looking nice, instead of all over the floor like it used to be. (Another sale find from Michael’s)

This is where I keep all my works in process, things that need bias tape, snaps, or reworked. Mostly these are things that I’ve gotten frustrated with and put of to the side to finish at a later date when I’m not as irritated (or in the case for the snaps, when the baby is a wake so I don’t scare the living crap out of her when I use my hammer… one of these days I’ll actually buy snap pliers haha) This is also (conveniently) my ironing board.
30 Day Challenge: Day Two

Mission 100 in 1: Project One
Week One: Overalls
Well I have an oddly shaped baby, meaning she's ridiculously tall and think, therefore around her middle is about a 0-3 months sizes but her legs are more like a 9-12 month size. So, week one's project was a pair of overalls that would be long enough for her. I went to Joann Fabric this Sunday and (yay!) simplicity patterns were only 99 cents! So I got a few, one being a pattern with some cute overalls, a pants pattern, a hat, and a zip-hooded jacket and/or vest. LOVED it. So I figured we'd start with that so the baby's legs don't get cold in the 10 degree weather we're having right now.

I normally trace the size from the pattern I want onto paper so that I don't ruin the pattern, that makes it easier to continue to use the pattern's other sizes. (PS: new favorite toy... rotary cutter and cutting mat... best invention EVER!)
When it comes to putting it together, I tend to use French seams on everything I make... they are SO easy and gives a finished look without using a serger (I wish I could afford one, but hubby keeps telling me no :( ) How you do those, put fabric pieces WRONG sides together and stitch seam, then turn them and press the seam with RIGHT sides together and stitch the seam. It will come out with the unfinished edges inside a little pocket seam. Looks very professional and is super easy.


Snaps are done and its already starting to take shape, all we have to do now is try it on and hem the legs then add the leg snaps! For leg snaps I love the snap tape you can buy at the fabric store. so much easier than doing individual snaps, though it is a bit more expensive, one of these days I’m going to get it together to buy the cotton tape and make my own snap tape, but until then. We’ll continue to do it this way.
 Alright, we're done and loose threads are clipped. Now, just to get the baby into them :) She loves trying on her new clothes.

Well I have an oddly shaped baby, meaning she's ridiculously tall and think, therefore around her middle is about a 0-3 months sizes but her legs are more like a 9-12 month size. So, week one's project was a pair of overalls that would be long enough for her. I went to Joann Fabric this Sunday and (yay!) simplicity patterns were only 99 cents! So I got a few, one being a pattern with some cute overalls, a pants pattern, a hat, and a zip-hooded jacket and/or vest. LOVED it. So I figured we'd start with that so the baby's legs don't get cold in the 10 degree weather we're having right now.

When it comes to putting it together, I tend to use French seams on everything I make... they are SO easy and gives a finished look without using a serger (I wish I could afford one, but hubby keeps telling me no :( ) How you do those, put fabric pieces WRONG sides together and stitch seam, then turn them and press the seam with RIGHT sides together and stitch the seam. It will come out with the unfinished edges inside a little pocket seam. Looks very professional and is super easy.

I HATE when patterns say to use buttons/button holes... really? This is for a baby... those are kind of not user friendly for those cases. So I always do snaps instead. We have a love affair with snaps in my house. I switch those out for buttons and zippers whenever possible.


And this is the pretty girl in her new overalls. They look great on her and they're long enough YAY!! At 25.5 inches at 3.5 months, I fear momma will be making alot of her pants in the future.
Tuesday, January 18, 2011
30 Day Challenge: Day 1
Day One: A picture of you and 15 interesting facts about yourself.


It’s really HARD to find a semi-recent picture of myself alone! so I just chopped the photo)
1) Every one tells me how artsy I am and unique, and that my career does not match my personality, by day I'm a mild-mannered safety manager for a defense contractor, by night I’m a crafting mamma. People say (for lack of a better definition) my job is "boring" and I’m "exciting".
2) It has always been my dream to live (for at least a short time) inLos Angeles
3) I could sleep for 14 hours with no problem- Pre-baby, I spend all day on Sunday in bed watching TV, and I loved it.
4) I would love to lose weight, but I just like the foods that are bad for me too much to quit them.
5) I have a story for EVERYTHING... I'm like an old man. (Ahhhh, that reminds me of this one time.....)
6) I am the most random person EVER. My friends joke that they can say something and I will randomly come up with a new thought. I’ve realized it’s because my brain links things (this reminds me of that, which reminds me this, which reminds me of that, etc) so quickly that I say something and people are like "what?”
7) Before I met my husband, I never really thought of myself as someone that would have kids (and my friends would say I wasn't even the type to have a serious relationship).
8) I LOVE sewing and crafting and such... and I’m really good at it. I think it is because I’m such a perfectionist.
9) Before I had my daughter, I was very big into music and went to lots of concerts. Though for the music I like, I’m getting a little old to attend the concert (think average age of 16 at these shows haha)
10) Speaking of music, I can seriously hear a song once and memorize the lyrics. It boggles my husbands mind. I'll just start singing it in the car... which is another story because I’m a HORRIBLE singer... but when I’m alone in the car its my favorite thing to do.
11) I wish that I could afford to be a stay at home or work at home mom.
12) I've always wanted to blog, but I’ve never known what to blog about...
13) Back in high school, I used to have loads of friends, since then I’ve pared down to just a few. I like it better this way. It might sound selfish, but it takes too much time to maintain relationships with too many people once you don't live in the same city any more.
14) I feel like I moved to the snow capital of theUSA
15) I have a serious addiction to fabric. I could spend small fortunes in Joann's every time I take a trip there.
Well that’s Day one. Day Two tomorrow!!!
1) Every one tells me how artsy I am and unique, and that my career does not match my personality, by day I'm a mild-mannered safety manager for a defense contractor, by night I’m a crafting mamma. People say (for lack of a better definition) my job is "boring" and I’m "exciting".
2) It has always been my dream to live (for at least a short time) in
3) I could sleep for 14 hours with no problem- Pre-baby, I spend all day on Sunday in bed watching TV, and I loved it.
4) I would love to lose weight, but I just like the foods that are bad for me too much to quit them.
5) I have a story for EVERYTHING... I'm like an old man. (Ahhhh, that reminds me of this one time.....)
6) I am the most random person EVER. My friends joke that they can say something and I will randomly come up with a new thought. I’ve realized it’s because my brain links things (this reminds me of that, which reminds me this, which reminds me of that, etc) so quickly that I say something and people are like "what?”
7) Before I met my husband, I never really thought of myself as someone that would have kids (and my friends would say I wasn't even the type to have a serious relationship).
8) I LOVE sewing and crafting and such... and I’m really good at it. I think it is because I’m such a perfectionist.
9) Before I had my daughter, I was very big into music and went to lots of concerts. Though for the music I like, I’m getting a little old to attend the concert (think average age of 16 at these shows haha)
10) Speaking of music, I can seriously hear a song once and memorize the lyrics. It boggles my husbands mind. I'll just start singing it in the car... which is another story because I’m a HORRIBLE singer... but when I’m alone in the car its my favorite thing to do.
11) I wish that I could afford to be a stay at home or work at home mom.
12) I've always wanted to blog, but I’ve never known what to blog about...
13) Back in high school, I used to have loads of friends, since then I’ve pared down to just a few. I like it better this way. It might sound selfish, but it takes too much time to maintain relationships with too many people once you don't live in the same city any more.
14) I feel like I moved to the snow capital of the
15) I have a serious addiction to fabric. I could spend small fortunes in Joann's every time I take a trip there.
Well that’s Day one. Day Two tomorrow!!!
Monday, January 17, 2011
Mission 100 in 1: an Introduction.
Now that my husband has agreed to letting me set up a sewing corner in my living room (so I no longer have to lug out everything each time I need to do something and set up on my COFFEE TABLE) I've decided that I wanted to do a project, made up of lots of smaller projects. It’s my mission to try a new project each week for a year.
I started this year off with a bang deciding I wanted to go into business for myself, trying to sell some of these items I'm designing and making. I find a lot of patterns and tutorials online, and I love them :) I also love coming up with them myself, for now, I'm going to do a mix of my own designs, patterns I buy from the store, and tutorials/patterns I find online (since at this time, I think it would be a little TOO ambitious to try to do designs every project myself, I don't know if I could come up with enough for that. I may even try to do tutorials for the things do I design myself. This is a work in progress, and I'll watch it develop as it goes :)
For starters, I'll post some of the stuff I've made so far this year:
This is a sleep sack, it was my first project after I set up shop in my living room its adorable, though the zipper was very irritating, it took more time to finish the zipper than it did for the entire rest of the sack, I need to figure out a better way of doing this!!! Basically this is a simple pattern I designed on my own after looking through a book of Burda patterns. I saw this and said to myself, "Wait, there is NO way I'm spending 5 dollars on a pattern this easy! I can figure this out myself, so I went home and went to work. I bought the zipper a little too long, but again, this was a first try and it'll get better with time.

The next is a cute skirt jumper I made for my daughter. It is a Burda pattern I bought. I love it. It also came with overall patterns and pants patterns. I have plans to try each of them. But I had to start with this one. I saw this fabric and fell in love. I knew I needed to make a dress out of it. It is a corduroy fabric with peace signs.


The Next is a bib that started as an idea and just kind of developed (I'll try a tutorial for this in the future when I completely figure it out). With a teething 4 month old, I needed something to protect her clothing from her drool. Its averaging 15 degrees up here in central PA and wet clothes make for a cold baby. So there was a need for a bib, and what baby can't live without a paci? Not mine. So I wanted to a have a paci strap attached, the other thought was that I really loved the clothing she had that had pockets. We would store her paci in there when she wasn't using it because it would get in the way otherwise, but what about those items of clothing without pockets? That’s when this design came to me. I happen to be at work, walking mindlessly through the building and had to rush back and do a quick sketch to figure it out. But it work. I though, why don't I just combine all of the things I love/need into one, and this is what came from that.


well that's all for now, next installment. project number 1 :) see you then!
Subscribe to:
Posts (Atom)